Building a Standalone Temperature Logger: Part 6
Posted in Projects on Feb 8th, 2011
Welcome to Part 6, it’s been a long project so far and we are coming close to the end. In this part we’ll explain how and why we need to change our circuit and code from 5V to run at least at 1.8V.
The reason being because of communication between the Arduino and ATtiny, if you were to run the ATtiny at 1.8V and hook up the Arduino to it, the ATtiny Digital or Analog input can only go to a maximum of 1.8V. So you’re feeding 5V from the Arduino to the ATtiny at 1.8V, you’ll overload the inputs and are highly likely to damage the chip.
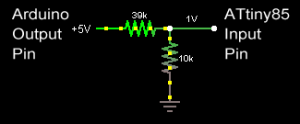
How can we connect both microcontrollers together if they operate at different voltages?
Option 1: If you recall from Part 4 we learned about voltage dividers, we can use this technique to divide the voltage in such a way that the Arduino’s 5V output can be divided to lower voltage. We can use a 39K resistor along with our already 10K resistor


